The following guide will show you how to setup an OpenVPN connection in Gnome Network Manager
The below has been performed on Ubuntu 18.04
1. Download our OpenVPN Bundled Server profiles from HERE
2. Extra the .ZIP file
3. Browse to the extracted folder. Enter in a country folder (eg Russia folder) and extra the profile you would like to use. This should give you another folder with 3 files in it (.key .crt .ovpn)
4. Open up terminal and type in sudo apt-get install network-manager-openvpn-gnome (ubuntu/debian) or yum install network-manager-openvpn-gnome (redhat/centos/fedora)
5. Click on your network connection > Wired connected > Wired Settings
6. Click + and select OpenVPN
7. Enter in a connection name (can be anything)
8. Enter in the server address you are setting up
9. Type = Password
10. Enter in your VPN username (not your email) and password
11. Click on CA Certifcate and browse to the Country folder/profile you extracted above and select the .CRT file
13. Click on Advanced
14. Select the same options as below.
- Use custom gateway port: Enter in the portnumber that you would like to use. This must be the same as the profile you wish to use from the extract .ZIP file above
15. Go to Security tab and set Cipher to AES-256-CBC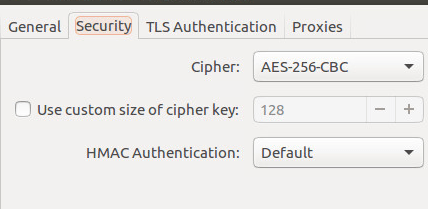
16. Click on TLS Authentication tab
Mode = TLS-Crypt
File = Browse to where you extracted to profile above and select the .KEY file
To connection to the VPN, simply click on your network connection > VPN > Connect
NOTE: If you experience any DNS issues, please do the below
On Ubuntu 17 and above run the following commands, then re-connect to VPN
# sudo nmcli connection modify <vpn-connection-name-you-set> ipv4.dns-priority -42
# systemctl restart network-manager.server
On Ubuntu 16.04 do the below
- Edit /etc/NetworkManager/NetworkManager.conf and comment out "dns=dnsmasq" line
#dns=dnsmasq
- Restart NetworkManager - service restart network-manager
